Tuesday, November 22, 2011

Cops and Robbers

This was a really fun cake to make. My son, Gregory, turned 5 today, and what better way to capture little-boyhood than with cops and robbers!  He has been asking me for a police man cake for months- fine tuning his ideas with each passing week.  So I did some internet searches and settled on this design. What I love most about this cake is the colors.  I love blues and greens and reds all thrown together.  Love it!  My little turkey loved it, too.


Cake details:
8" golden cake with fudge filling
iced with vanilla buttercream and decorated with fondant "accessories"


Monday, October 10, 2011

City space shuttle cake


The birthday cake is complete!  My son is a great kid.  I love him to death, AND I love his imagination.  When it comes to cakes he and his younger brother start requesting them months ahead of time complete with little nuances that twist and evolve all the way up to baking day.  My son even drew me a picture of what he wanted (he's a very detail oriented little guy).  So this little ditty is what I came up with for him.  
Until a few years ago, we lived in New York, and he still talks about it all the time-- mostly the buildings and snow.  So I made him a city cake topped with his newest fascination: space shuttles.  Needless to say, he is thrilled with the final product, and so am I!
  
Details: 8/10" round chocolate cakes with fudge filling and vanilla buttercream icing. All the decoration pieces were made from fondant days in advance so they would harden enough to stand up.  I made a small batch of royal icing and added the window details with a #2 tip.  The little taxis and police car were decorated with food color marker. (I had added clouds, but they looked funny so I took them off! :)


Sunday, October 2, 2011

Cement Truck Birthday

This cake is just the first of many baking projects in the queue for this week.  I have truffles, cupcakes and my son's 7th birthday coming up. Whew! This creation is a golden yellow cake with strawberries and whipped cream filling.  The outside is iced with vanilla buttercream, and the truck and cones are made from fondant.  This was a really fun cake to make. Once in a while I get a cake where everything just seems to go "right."  And I think this was one of them!  Besides, having two boys of my own, I tend to love all things truck and transportation related! :)

Saturday, September 10, 2011

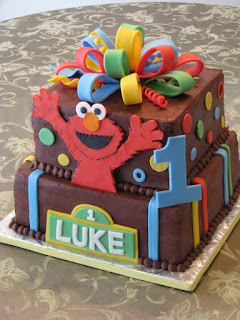
Elmo Birthday

Three cheers for Elmo!  I made my first ever Elmo cake this week, and it was kinda fun! I googled around for a nice image of Elmo, printed and traced him onto fondant. Then I cut out his eyes, nose and mouth, assembled him and drew in some detail with a Wilton food marker.  He sure was a happy looking fellow.  It was almost like he was cheering me on as I made the rest of the cake!  I also love the name plate.  I was going for the Sesame Street sign look, and I think it nailed it on the first try.  That sure was a relief.  The rest of the cake just sort of came together..
Did I ever mention that I LOVE making fondant bows??  They always look so cheerful!!  
I don't really have any particular wisdom to share about this cake- except that it took a solid two days for Elmo to harden enough to be handled. I also made the name plate, "1" and the bow loops the day before.  Never wait until the same day to make bow loops.  They need at least 24 hours to set, and it usually takes about 16 loops to get a nice full bow. Cut a few skinny strips and wrap them around a pencil and you have little "curled" ribbons, too!

Monday, August 29, 2011

Cake Pops 1.0

During this past weekend of cake orders, I did suffer a minor cake-tastrophy when one of my chocolate cakes decided it wasn't quite ready to part with the pan.  Yes, it stuck, and I hate it when that happens.  So, I had a perfectly good layer of chocolate cake missing part of its backside.  What to do?  Well, I have a hard time just throwing cake away, so I saved it and decided to give these popular cake pops a try.


I googled around and read a few sites (little did I know just HOW popular these little sugar bombs are!) and decided to go for it.  First, I made a small batch of chocolate frosting and mixed (not too much of it) with the crumbled cake.  Then I scooped up the cake mixture and rolled it into balls.  I took some lollypop sticks and dipped them in some melted white chocolate candy melts and inserted one into each cake ball.  Next, I put them in the fridge for an hour or so to harden a bit and then rolled them in melted chocolate (tinted yellow).  I sprinkled them with some decorations and stuck 'em into some styrofoam.  Voila! Cake pops!  After they dried, I grabbed some little bags (yes, I do happen to have all this stuff lying around) and tied them with some ribbon.  Trick or Treat!

Friday, August 26, 2011

Quartermaster Cake


This week's cake project had me diving into my first ever Scout cake... more specifically, a SEA Scout cake.  Yes, there is such a thing as Boy Scouts on water, and their equivalent to the Eagle Scout award is the Quartermaster Award.  Sea Scouts is a co-educational program which means that not only do boys participate in all their sailing adventures, but girls do, too!

This was the first time I experimental with food-friendly metallic painting.  I've used various luster dusts before to give some of my ribbons a little shimmer, but this is the first time I turned those powders into a "paint" and went for the full blown metal effect.


After cutting out my pieces of the quartermaster medal from fondant I had tinted gray, I piped on some finer details with royal icing.  When that dried, I mixed CK Products silver luster dust with a little clear vanilla and made what was, essentially, paint.  I had been told that you're supposed to mix vodka or lemon extract with the luster dust, and I had intended on using the lemon, but in my foggy head of late night television, I grabbed clear vanilla by accident, and it worked just fine!  Phew!

Need a recipe for royal icing?  All  the ones I have make a ton of icing which is much more than what I needed for my little medal, so I went to allrecipes.com and found a recipe that I scaled to make a solid 1/2 cup.  Plenty for my little project.

Royal Icing (makes 1/2 cup)

2-1/4 teaspoons meringue powder
  • 1 cup sifted confectioners' sugar (always use pure cane)
  • 1 tablespoon and 1-1/2 teaspoons water

I jut mixed all the ingredients with an icing knife for 5 minutes or so until it had a peanut buttery consistency and a slight matte finish.  Worked great!  Oh, and the cake pictured above is a 14" round chocolate cake with raspberry mousse filling and vanilla buttercream on the outside.  Yum!  

Red Ribbon

This is a bit of old news, but I entered my first attempt at a sandcastle cake in the June 2011 Marin County Fair and took 2nd place!  To be honest, there were not a huge number of cakes entered, but I'm still proud of my award-winning Nabisco creation.
In order to create a sturdy canvas, I covered the cakes with fondant.  Then I spread buttercream on top and pressed a mixture of pulverized brown sugar, graham crackers, and Nilla wafers into the frosting.  The little sea creature buddies and flag were molded from fondant, and I used royal icing to make the seaweed.  All in all, it was a fun cake to make!

Wednesday, August 24, 2011

New Digs

Well, as readers familiar with my old website can see, Crestwood Cakes has undergone a "subtle" facelift.  I decided to leave Crestwood behind and embrace my inner Dixie... school district, that is.  I chose the name Crestwood Cakes while we were living in New York near the Crestwood train station as I dreamed of one day opening up shop near there.  Well, now that we've made the big move to California, I thought it might be cute to switch to a more local moniker and chose Dixie Cakes (after our local school district) as the new "brand" of my hobby.  

Oh, and I also changed to a blog format for picture posting.  I figure this way I can better tell the story of each creation as it exits my kitchen.  Now I just have to figure out how to bring over all my photos.... :)

Enjoy!